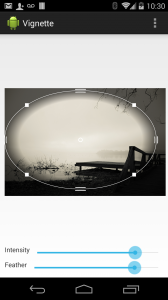
Let’s say you want to want to dynamically apply a “vignette” on an ImageView.
Something like this:
 |
These are basically 4 steps we need in order to accomplish the task:
Continue reading
Let’s say you want to want to dynamically apply a “vignette” on an ImageView.
Something like this:
 |
These are basically 4 steps we need in order to accomplish the task:
Continue reading
I’ve just created this simple Android library, inspired from the recent changes to the Google+ app, which introduced a floating action item to the bottom. In G+ the action item appears and disappears based on the page scrolling.
In the same way I’ve created this library, with some more customization options, like the gravity and direction of the floating menu items.
Here’s a video of a sample implementation:
Source code and documentation can be find on the github project page:
I recently added more changes to my forked version of the Picasso library.
Delay
Added withDelay(long ms) method in the RequestCreator class. Basically it will delay the load of the passed resource by n milliseconds.
[cce]
Picasso.with( context )
.load( url )
.withDelay( 100 )
.into( image );
[/cce]
Batch toggle on/off
In the original Picasso code all the “complete” events are dispatched using a batch operation, this means that you can have at the same time 3/4 “complete” events being triggered, which eventually can cause lags in the UI.
In this fork the batch is disabled by default and can be re-enabled by using:
[cce]
Picasso.with( context )
.setUseBatch( true );
[/cce]
Fork or download the source from GitHub:
https://github.com/sephiroth74/picasso
Link the library in your build.gradle:
compile “it.sephiroth.android.library.picasso:picasso:+”
Recently I started using this nice library, Picasso, for my Android projects.
Basically it’s a library which allows you to load any type of images (local or remote, assets or resources) asynchronously into your ImageView. It will load them in background for you, this not blocking the UI. It has also an internal cache system and it also comes with some useful features like “fade” ( when an image is loaded into the view it will automatically create a fade in effect ), “transform” ( you want to post transform the loaded bitmap ), “resize”, “fit” and more.
You can find a better explanation of the project here: http://square.github.io/picasso/
By the way, long story short, as often happens, when you start to use a 3rd party library you also find it’s limitations and you want to make your own changes to fit your particular needs. In fact I made a fork of this library starting adding my changes.
Here’s a first list of changes I made:
Cache
Added the possibility to use an external cache instance per request.
Example:
[cce]// creating a cache object with 1MB max size
Cache cache = new LruCache( 1024*1024*1 );
// now create a new request which will use this cache object
Picasso.with( this ).load( file ).withCache( myCache ).into( imageView );[/cce]
Remember to clear the cache when you don’t need that anymore ( using cache.clear() )
Generators
Generators can be used to load images which cannot be loaded using the common scheme convention. There are different situations when you need to generate a Bitmap which is not directly related to a file or url or even a real bitmap resource.
In this case you can use the scheme “custom.resource” with a Generator.
A Generator is a simple interface with only one method:
[cce]public interface Generator {
Bitmap decode( String path ) throws IOException;
}[/cce]
So you can use a generator in this way:
[cce]Picasso.with(this)
.load( Uri.parse( “custom.resource://” + file ) )
.withGenerator( new Generator() {
@Override
public Bitmap decode( String path ) throws IOException {
return whatever(path);
}
} ).into( imageView );
[/cce]
Resize
Both the original Picasso methods resize and resizeDimen have been modified in the followings new methods:
[cce]public RequestCreator resizeDimen(int targetWidthResId, int targetHeightResId, boolean onlyIfBigger);
public RequestCreator resize(int targetWidth, int targetHeight, boolean onlyIfBigger);[/cce]
basically you can pass an option to skip the resize operation if the loaded bitmap is smaller than the passed `targetWidth` and `targetHeight`
BitmapFactory.Options
Picasso uses a default BitmapFactory.Options object, every time, to decode the required Bitmap.
I’ve added a method `withOptions` in the RequestCreator which allow you to pass your own Options object which will be used to decode the image.
Example:
[cce]BitmapFactory.Options options = new BitmapFactory.Options();
options.inPreferredConfig = Config.RGB_565;
Picasso.with(this)
.load(file)
.withOptions(options)
.into(imageView);
[/cce]
As you may have noticed I’m not working with flash and actionscript anymore. However I still receive some requests regarding the purePDF library I published, well I don’t remember when exactly 🙂
By the way, I decided to move the code to github, thus it will be easier for anyone still interested in that library to fork and add modifications and share to other people.
Here’s the link to the project: https://github.com/sephiroth74/purePDF
This is a simple widget I created as part of the Aviary Editor SDK for Android. It creates a wheel-like widet which can be scrolled in both directions.
The idea was to replace the default slider widget and use a more “real world” component.
Moreover if you’ll add the VIBRATE permission into your AndroidManifest.xml file you’ll have also haptics feedback while the wheel is scrolling:
[cce]<uses-permission android:name=”android.permission.VIBRATE” />[/cce]
To include the wheel widget in the current layout, you should add in the layout xml this lines:
<it.sephiroth.android.wheel.view.Wheel
android:id=”@+id/wheel”
xmlns:sephiroth=”http://schemas.android.com/apk/res/it.sephiroth.android.wheel”
android:layout_width=”match_parent”
android:layout_height=”match_parent”
sephiroth:numRotations=”6″
sephiroth:ticks=”28″ />
Where numRotations is the max number of rotations the wheel can perform and ticks is the total number of ticks the wheel will display.
Then in your activity you can add a OnScrollListener listener to the wheel widget, in this way:

mWheel = (Wheel) findViewById( R.id.wheel );
mWheel.setOnScrollListener( new OnScrollListener() {

@Override
public void onScrollStarted( Wheel view, float value, int roundValue ) {
}

@Override
public void onScrollFinished( Wheel view, float value, int roundValue ) {
}

@Override
public void onScroll( Wheel view, float value, int roundValue ) {
}
} );
You can download the source at the gihub project page.

Update: the source code has moved to github, so it’s easier for anyone to fork it!
As long as Android doesn’t have a built-in ImageView widget with zoom and scroll capabilities I tries to create one by myself starting from the google repository.
The result is pretty nice so I’m posting here the source code, if anyone is interested, or simply doesn’t want to waste the time creating a new one.
Here’s a sample code on how to use it in an Activity:
Anyway, if you want to download the source, here is the eclipse source project:http://blog.sephiroth.it/wp-…/ImageZoom.zip
https://github.com/sephiroth74/ImageViewZoom
package it.sephiroth.android.demo;
import it.sephiroth.android.library.imagezoom.ImageViewTouch;
import java.io.IOException;
import android.app.Activity;
import android.database.Cursor;
import android.graphics.Bitmap;
import android.net.Uri;
import android.os.Bundle;
import android.provider.MediaStore.Images;
import android.view.Window;
import android.view.WindowManager;
import android.widget.Toast;
public class ImageZoomActivity extends Activity {
	private ImageViewTouch mImageView;
	@Override
	protected void onCreate( Bundle savedInstanceState )
	{
		super.onCreate( savedInstanceState );
		requestWindowFeature( Window.FEATURE_NO_TITLE );
		setContentView( R.layout.main );
		getWindow().addFlags( WindowManager.LayoutParams.FLAG_FULLSCREEN );
		selectRandomImage();
	}
	@Override
	public void onContentChanged()
	{
		super.onContentChanged();
		mImageView = (ImageViewTouch)findViewById( R.id.imageView1 );
	}
	/**
	 * pick a random image from your library
	 * and display it
	 */
	public void selectRandomImage()
	{
		Cursor c = getContentResolver().query( Images.Media.EXTERNAL_CONTENT_URI, null, null, null, null );
		if ( c != null ) {
			int count = c.getCount();
			int position = (int)( Math.random() * count );
			if ( c.moveToPosition( position ) ) {
				long id = c.getLong( c.getColumnIndex( Images.Media._ID ) );
				int orientation = c.getInt( c.getColumnIndex( Images.Media.ORIENTATION ) );
				Uri imageUri = Uri.parse( Images.Media.EXTERNAL_CONTENT_URI + "/" + id );
				Bitmap bitmap;
				try {
					bitmap = ImageLoader.loadFromUri( this, imageUri.toString(), 1024, 1024 );
					mImageView.setImageBitmapReset( bitmap, orientation, true );
				} catch ( IOException e ) {
					Toast.makeText( this, e.toString(), Toast.LENGTH_LONG ).show();
				}
			}
			c.close();
			c = null;
			return;
		}
	}
}