Android: pipe(“|”) and ProcessBuilder

As of today there’s no public implementation of the java ProcessBuilder.startPipeline in Android.

So I came out with this quick solution, using Kotlin, to pipe multiple processes in Android:

object ProcessUtil {
    private fun check(process: Process, error: (() -> String)) {
        try {
            if (process.errorStream.available() > 0) {
                process.errorStream.bufferedReader().use {
                    it.readText().also { errorText ->
                        check(errorText.isBlank()) { "${error.invoke()} failed with error: $errorText" }
                    }
                }
            }
        } catch (_: IOException) {
            // ignore
        }
    }

    @Throws(IOException::class, IllegalStateException::class)
    fun pipe(vararg processes: ProcessBuilder): String {
        check(processes.size > 1) { "At least 2 processes are required" }

        var previous: Process? = null
        var result: String = ""

        processes.forEachIndexed { index, builder ->
            val cmdString = builder.command().joinToString(" ")
            println("Executing command $index -> $cmdString")

            if (index > 0) {
                check(builder.redirectInput() == Redirect.PIPE) { "Builder redirectInput must be PIPE except for the first builder" }
            } else if (index < processes.size - 1) {
                check(builder.redirectOutput() == Redirect.PIPE) { "Builder redirectOutput must be PIPE except for the last builder" }
            }

            val current: Process = builder.start()
            check(current) { cmdString }

            previous?.let { prevProcess ->
                prevProcess.inputStream.bufferedReader().use { reader ->
                    current.outputStream.bufferedWriter().use { writer ->
                        reader.readLines().forEach { line ->
                            println("writing --> $line")
                            writer.write(line)
                            writer.newLine()
                        }
                        check(current) { cmdString }

                    } // writer

                    if (index == processes.size - 1) {
                        current.inputStream.bufferedReader().use { reader2 ->
                            result = reader2.readText()
                        }
                    }

                } // reader
            }
            previous = current
        }
        return result
    }

    fun pipe(vararg commands: List<String>) = pipe(*commands.map { ProcessBuilder(it) }.toTypedArray())

    fun pipe(vararg commands: String) = pipe(*commands.map { ProcessBuilder(it) }.toTypedArray())
}

And it can be used like this:

    @Test
    fun testPipe() {
        val packageName = context.packageName
        val result = ProcessUtil.pipe(listOf("ps", "-A"), listOf("grep", packageName), listOf("awk", "{ print $9 }"))
        println("result = '$result'")
        Assert.assertTrue(result.contains(packageName))
    }
Photoshop Extension: Opacity Editor

Today I’d like to introduce an extension I’ve created for Adobe Photoshop: Opacity Editor.

I like to take pictures, ok, I’m definitely not a professional photographer, but I still like to try to be one 🙂

In particular I like to take pictures at night, I like to take pictures of moving clouds, stars.. etc. And then I like to stack all the photos into a single document. The problem is that most of the times this Photoshop document has hundreds, if not thousands, of layers (and we’re talking about 40MP images) and, despite the fact that photoshop can barely survive after I’ve added all those layers to the document, the real problem comes after that.. In order to create a nice stacking effect it’s not just a matter of changing the blending mode of the different layers, but also to change their opacity.

Unfortunately Photoshop doesn’t have an option to manage the opacity of multiple layers at the same time, like, for instance, from 0 to 100 of all the selected layers.. or even more advanced options.

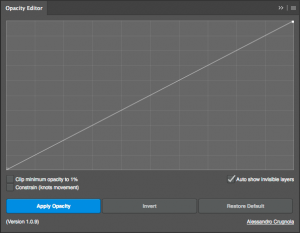
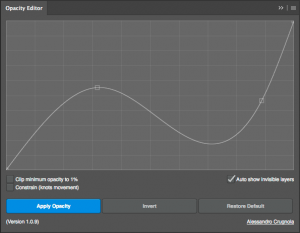
That’s why I’ve decided to make an extension (available here) for this. This is it’s pretty easy interface:

So basically what it does is: you select a bunch of layers in your document, then you create the bezier curve. Once you click on “Apply Opacity” the opacity of every selected layer will follow the designed curve value. Let’s make it easier. If you design a curve like this:

the first selected layer will have an opacity of 0 (completely invisible), while the last layer will have 100 as opacity. (If you’ve selected 100 layers, then the second one will have an opacity value of 1, the third of 2 and so on..)

These 2 images, for instance, have been created using this extension:


1200~ pics


The second one is the result of 1200 layers stacked together and without that extension I would probably still working on it!

And here’s an example of the Extension in action:


For more information and download:
https://www.adobeexchange.com/creativecloud.details.20327.html

Compile skia for android on Mac Lion

Some time ago I started to look at skia as possible solution for graphics 2D editing for a native android project I was developing.
Well, even if skia is part of the android system and it’s used everywhere by android itself, trying to include skia in my project was quite an hell..
Looking for resources I just found old examples and tips, and every try was just a failure.. but since android uses skia internally to do graphics operations I decided to look into the android project.

After downloading the skia module from the android git repository I just realized it couldn’t be compiled by itself because it has external dependencies. So next step was to download and compile the whole android source code. Easy task? not at all, at least if you’re on a mac running Lion!

At the end I managed to compile everything and build the skia module as static module, in this way now my project can link the skia library and include correctly the skia headers.

Ok, I don’t have the whole procedure step by step here, first of all because it depends on the android version you’re going to compiled, second and most important because I didn’t write down all the steps 🙂 So this is more a sort of list of notes about compiling android on Lion and a reminder for myself too. ( I was trying to compile android 2.2 using “generic-user” as lunch configuration )

Build Android: http://source.android.com/source/initializing.html

To get rid of clearsilver errors: http://code.google.com/p/android/issues/detail?id=993#c27

Java 1.5 version complaining: http://wiki.oneswarm.org/index.php/OS_X_10.6_Snow_Leopard

Well, the first time you’ll try to “make” everything probably you’ll get this error:

[cc]
./external/elfutils/config-compat-darwin.h:42: error: static declaration of ‘strnlen’ follows non-static declaration
[/cc]

modify ./external/elfutils/config-compat-darwin.h.
replace:
[cc lang=”c”]
static inline size_t strnlen (const char *__string, size_t __maxlen)
{
int len = 0;
while (__maxlen– && *__string++)
len++;
return len;
}
[/cc]

with:
[cc lang=”c”]
#if 0
static inline size_t strnlen (const char *__string, size_t __maxlen)
{
int len = 0;
while (__maxlen– && *__string++)
len++;
return len;
}
#endif
[/cc]

Well, at the end of the process I just edited the Android.mk makefile into external/skia adding a new entry for BUILD_STATIC_LIBRARY and the next command was simply:

[cc]mmm external/skia[/cc]

which produced the required libskia.a file to be linked in my project.

How-to debug native code with Android

This is a step by step guide for executing and debugging native code on Android with Eclipse.

1. Prerequisites

The SDK version used for this guide is Froyo with the NDK r4b ( crystax release ).
Also Eclipse CDT plugin it’s very useful for our purposes, so install it.
Last plugin to install it’s the Sequoyah plugin for Eclipse.

2. Project setup

At this point let’s create a new Android project, name it “Example” and use the “com.darkwavegames.com” package name, add also an Activity name of your choice.
Select Android 2.2 as base SDK version and complete the project wizard.

Now you need to add the native support for the newly created project. Just right click on the project root element in the package explorer and select “add native support”.

In the next dialog write the path of your NDK folder and give also name for your library.
After this operation a new folder “jni” will be created with a .cpp file, header filer and an Android makefile, Android.mk, which can be edited to modify all the includes, linker and compiler options. In the Android.mk file you also need to specify all the source file you want to use within the LOCAL_SRC_FILE directive.

3. Debug

In order to enable debug of native code in Android you have to face different problems, based also on the device and the firmware version, and if the native code is multi thread or single thread.
First of all you need to mofify the AndroidManifest.xml file adding the attribute “debuggable” to true ( remember also to enable the “Debug USB” option under the Application device menu ).
At this point you can debug all the java code within your eclipse debugger, for for the native C debug you need more steps.

Continue reading

Android: Create your own sharing app

One of the first applications I did for Android was a very simple application which simply takes a picture using Camera and then send it to a remote server. Very simple, but it introduced to me into the android world and the notion of activities and communication between different applications.
A little addition to this application I wanted to make was the possibility to share any of the pictures already taken. To do that I wanted to add the application to the list of the choices which appear when an user click on the “share” button when view an image using the default Gallery application.

Continue reading

Haxe got (awesome) macros!

Hi guys, It has been a while since I posted the last time.
However I felt like it was the right moment to go back on the blog, to talk you about the new awesome Haxe macro system.

As you can read on Nicolas’s blog, they’re only present in the latest SVN update, but they will be included in the next build as soon as they will be perfect.
I must say I’m extremely happy about that addition: one of the most important reasons I’m so happy is the fact that instead of implementing an old-and-bording Macro system ala C/C++, Nicolas decided to go for a much more powerful macro system, which allows typesafe macros and real runtime code generation.

You are not limited to simple stuff like replace a macro call with a block of source code, but you can generate any kind of valid AST expressions that will be evaluated by the macro preprocessor at compile time.
Moreover you have access to almost the whole neko library (io, net, etc) which means you can write extremely powerful code generators and DSL! That’s an awesome feature – really.

Give it a look!

Amethyst Actionscript editor

amethyst screenshotIt’s since the first time I used Eclipse that I’m waiting for an actionscript editor non eclipse based!

I never like eclipse and hated all its problems.
Unfortunately Adobe decided to implement its editor over eclipse and also other nice editors, like fdt, used the eclipse framework to build their own editors.
I used Visual Studio for a while but that was enough to make me fall in love with it.
Visual Studio is indeed the best editor at all, without doubts!
Finally I discovered an interesting project for editing actionscript projects integrated into Visual Studio.
Amethyst is still in beta and probably too premature to be used in large production environment, but it’s a great news for me.
I hope they’ll continue in the development and create a serious competitor for Flash Builder.
For more info visit their product page: http://www.sapphiresteel.com/Amethyst-Product-Page

H.264 can’t kill flash

This is another interesting reading about the current discussion about HTML5, video and Flash: http://blog.streamingmedia.com/the_…-cant-kill-off-the-other.html.

Sincerely this last crusade against flash is just annoying me ( the same way the first svg crusade against flash ). In my humble opinion I think that next year HTML5 will be already an old technology and everyone will forget this war.